Tuesday, June 28, 2016

Altered Cigar Box - revisited

I did not have a chance to do any projects this past week since we had company. But I am hoping to be able to get some work done this week. My husband turned 70 and his sister flew in from Connecticut to visit. We had a great time.

This was originally posted in 2013. Many posts prior to April of 2014 are not available anymore. I hope you enjoy this one. 
-------

Do you have some old cigar boxes sitting around? Don’t know what to do with them?

How about painting and embellishing them to create a keepsake box? It would make a great birthday or Mother’s Day gift.

While looking through my notes and lists for projects I remembered this wooden cigar box I found at a yard sale a few years ago.

 
I started by removing the stickers and labels. A little water, some time and then sand paper helped me clean the box and get it ready for some paint.


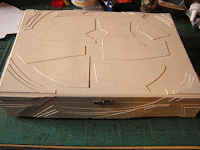
A nice tan colored acrylic paint was perfect for the base coat.  Then I went looking for some inspiration. I was thinking ‘Fairy Box’, but got sidetracked by Steampunk.

So I started cutting up cereal boxes and gluing the pieces on the box. Cereal boxes are a nice lightweight cardboard that can be easily bent. It isn’t too thick and adds just a slight amount of the raised look I wanted.


I roughly sketched the design on the box. Then I cut and glued all four sides, then the top. After that more layers were added for more interest. This project used the same techniques as the computer case I did in June last year.


Once all the glue was dry I used the same tan colored paint to cover everything and give it an even coat.

For some reason I broke three clothes pins in two days trying to pin up curtains. So I used the pieces of the pins for my feet on the box. They raise it up just a little, but enough to make it look cool. Plus they are unique and fun.


After that dried I used bronze by itself and then mixed with burnt sienna to get some nice effects.

Inside the box I glued some brown fabric. I decided that this would be a more masculine box.

For the top I added some necklace chains and some cool washers. After the glue dried I brushed them with some black and bronze paint to make them look old and worn. I added some cardboard gears and extra layers to it to give it more character.

Between some of the layers I also put several cardboard gears.  At left you see my weights for keeping the cardboard down while the glue dries. I find any heavy bottles I can.

Everything had to be planned as it was put on so the layering was right. After cutting pieces out, I laid them on with no glue to determine what order to put things on. This is important. You don’t want to put something on with glue then find out something else should have been put on first. Always do a dry run with the parts first, and keep on testing as you put it together. Lay each piece on as you go to double check the layout. (talking from experience)

Once everything was where I wanted it, and the paint and glue was completely dry, I used spray varnish to seal it. Wait at least 24 hours after you finish any painting or gluing to be sure all moisture has evaporated when using regular varnish. Moisture will cause bubbles or a rough texture on the surface.

On the corners of the box I used small sequins. I glued them on and then painted them the same color as the cardboard. This is a great and very easy way to simulate brads or screws. 

This was a fun project, and very messy. I had paint and glue all over my hands most of the time. I'm not done with it. I plan to add more of the sequins to look like brads, and maybe some more watch parts on the top.

The idea of decorating boxes is one that can be used in many ways. Kids can decorate keepsake boxes for themselves. Anyone can decorate a box to give as a gift.

If you don’t have cigar boxes, check Michael’s or Joann’s for their cardboard ones in the paper mache section. They have white ones that look like cigar boxes and are only a couple dollars each. You can buy little clasps or drill holes and add yarn and ribbon to tie it closed. 

Have fun, and never worry about being messy. J

Til next week.
Terri


1KrazyRtist


Tuesday, June 21, 2016

Steampunk Clay Hearts - revisited


This has been a very busy week. I had to work extra days because my boss was getting married and was gone for a week. so I didn't get to post last Tuesday. I also haven't had much time to create any new projects so here is one from May of 2012. Steampunk continues to be a trend so I thought we would revisit this post on polymer clay hearts done in a Steampunk theme.

Let’s talk Steampunk. The trend in fashion and accessories that is growing by the day.

Take a step back to 1800's and early 1900’s when there were no computers, no cars, no microwave ovens, and, no computers. What if the world had never seen so many revolutionary inventions? What if cars ran on steam? What if everything needed gears, or pulleys, or to be started with a crank?  Can you imagine the world? That is what the world of Steampunk conjures up in the mind. No television, no cell phones, or any of the techy things.

Many, many people have embraced this concept and are creating clothes, accessories, and artworks based on it. (Though they still use their techy devices (computers, printing presses) to create these things). Type Steampunk into your search engine and you will find thousands of sites selling everything under the sun. It’s a world that is reminiscent of Captain Nemo and Jules Verne. There is even a Steampunk eMagazine.

For a sci-fi buff, this is a dream world and if you are an artist too, well, it can provide tons of ideas for projects, artwork, jewelry and so much more.

So here are some ideas to bring the Steampunk influence into the world of polymer clay and jewelry.


The freeform Steampunk heart above was created with brown, black and tan clay. Watch parts and gears, screws, washers, wire and other fun things were pressed into the clay before baking, or glued on after. Screws are great because you actually turn them and screw them into the clay, they hold things on quite well.


The piece to the left was made with black and silver clays. The outer framework is a combination of the two so it looks like gray metal, with a sparkle. Most of the gears are made of clay with metal grommets and screws to give them realism. Faux screws are placed around the edge by rolling small balls of clay, then poking a hole into the center. The framework is actually layered and pieced to look similar to the inside of a watch.

This piece is approximately 1 1/2 x 1 1/2 inches. 


Poking decorative holes into the gears makes them look more realistic and adds interest to the piece.

The gears are made by running the clay through the pasta machine on the second or third thickest settings. Even though real metal gears are very thin, clay gears that thin would break easily.


When cutting the gears, cut one notch, then turn the circle around to the opposite side and cut another, then cut halfway between each of the first notches. Continue this way until you have the entire gear cut.  The photo shows the sequence of cuts. The smaller the notch you cut, the more teeth you get on the gear. 

Once the gears are cut and the base (a heart, circle, square, etc) is ready, it’s time to place all the parts. The clay will attach to other pieces of clay and most of the metal pieces will stay attached after the piece is baked.

 Be sure to create a way to hang your piece from a chain or cord. Using a gear, a metal ring, or a grommet through a hole in the top, are easy ways to create a place to put a jump ring. The brown heart at the top of the page has a wire hanger held on with screws. A wire loop was put into the top of the gold heart below. A piece of metal with two holes was used on the square piece. A screw was placed through one hole to keep it in the clay, the other hole is for the jump ring.

I like to keep a real watch available as a reference when placing the clay parts. It gives you an idea of placement and design. 

This heart was made using all clay gears with metal grommets. Designs were pressed into the heart before the gears were added to give it texture and a more industrial look. All the parts were put on before the piece was baked (using the manufacturer's instructions).

Once the polymer clay has cooled after baking, a varnish is put on the give it a shine. My favorite is Pledge Future Floor Wax. It seals and doesn't wash off. It may take from two to five coats to get the shine you want, but it will look beautiful when you are done.


Creating Steampunk art is fun and the pieces are always unique. I hope you try it within the medium you favor. Paint a picture, do a collage, make a piece of cool jewelry. Any medium can be adapted, so be creative.

Time to play (craft☺) and create my next post.  
Terri

Product Note: Polymer clay, the jewelry chain, and the grommets (used for scrapbooking) are available at Michael’s, Hobby Lobby, and Joann’s.  Also look for watch parts on Etsy and Ebay.

1KrazyRtist

Tuesday, June 7, 2016

From Notebook to Journal


About a week ago I got an idea and this is what came of it.


I went to the local dollar store and bought a composition book. My idea was to turn it into a journal and it only took a couple of hours.


The first step was to glue (with diluted ModPodge) white drawing paper to the front and back to cover the printing. My fabric was thin enough for the patterns and printing to show through.


Next I cut a piece of fabric approximately 16”x11”, then cut it into two pieces 8”x11”. I did it this way so the pattern continued from front to back.


The next step was to glue the fabric to the front and back. I positioned it just a little bit in from the center of the spine and used ModPodge to glue it down. Undiluted ModPodge would not saturate the fabric and would dry faster.


The fabric was about ¾” bigger than the cover to allow it to be folded to the inside. The corners are done first and then the edges folded over it. This gives it a nice finished look.


Then a piece of cardstock was cut to be smaller than the size of the inside of the cover. It was then glued (with ModPodge) to cover over the edges of the fabric. This gives a nice clean finish.


I thought it was boring so I found some fun scrapbooking paper and cut wedges to glue on the inside cover. I used Alene’s Original Tacky Glue for this step.


For the outside spine I cut a piece of contrasting fabric approximately 3” wide and about 2” longer than the length of the spine.


The ends were folded and glued. Then the sides were folded about 1/3” to 1/2” and glued down.


Then this was glued to the spine. It hides the edges of the fabric on the cover and gives a nice look to the book. It is important to keep the book closed when doing this step so the book will close properly when finished.


Then it was time to decorate the cover.

After a bit if trial and error I finally decided what to do. This means I laid a lot of different things on the cover to decide what looked best. I cut things out, I glued things, I dug through my stash of supplies. I spent at least an hour trying to make up my mind.


Finally, I tore some strips of the same fabric I used for the spine. I glued them on the front and back cover to create some interest.

Some copper wire mesh was laid on and then I found a polymer clay piece that I had made several years ago. It had been made to wear as a pin, but it is a bit large. It has stars on it so I found some other individual clay stars in my stash that I had made.

Since I keep parts from watches for my Steampunk projects I found some springs that match up to the designs on the fabric. An old button was glued into the center of one of the spiral springs. A small glass bead was glued into the center of the smaller one.


I decided to stop there. I did not want it to be overdone. I like how it came out and it is now ready to be used as a journal.

I did consider gluing some type of paper to the front sheet of writing paper to create a title page. I haven’t done it yet but it may happen later. Especially if I decide to give this away as a gift.


The whole reason for this project was to look for ways to create journals that would sell in the new Etsy shop I am designing. I am planning to open a second shop later this year that will be exclusively metaphysical.


 This project is fairly easy and could be a fun one for the kids. They could glue paper, ribbons, fabric, beads and much more to the cover of this inexpensive notebook and have a nice journal for their creative writing or personal diary. It’s perfect for one of those rainy afternoons, or here in Arizona it’s perfect for those extreme days when it is just too hot to go outside.

How would you decorate one?

Til next week.

Terri

1KrazyRtist