
My husband and I are Reiki Master Teachers and we needed
space for clients to sit during healing sessions. Now we have it.

So, while cleaning I found this great basket. I typically
use it for display purposes. But it had gotten beaten up a little and I did not
want to throw it away. So I repaired it and made it stronger. It measures
7”x18” and is 3” deep.
 The basket is made with some light weight wood with the
bamboo strips woven over it. The strips had broken and the ends were coming
off. I had glued it together once before and painted it. But it needed more
this time.
The basket is made with some light weight wood with the
bamboo strips woven over it. The strips had broken and the ends were coming
off. I had glued it together once before and painted it. But it needed more
this time.
I started by using my hot glue gun to reattach all the
broken parts. This is just to hold everything together while I do the next
step. The hot glue would not stand up to any long term use, especially since
one of the corners was completely torn and would never last.
 Next up I pulled out some lightweight muslin and tore it
into strips of different sizes. Tearing the fabric creates rough edges that
would give a great texture later.
Next up I pulled out some lightweight muslin and tore it
into strips of different sizes. Tearing the fabric creates rough edges that
would give a great texture later.
I used some ModPodge that had been diluted with a little
water to attach the strips of muslin all over the basket. I wanted to reinforce
the corners and cover the entire basket with the fabric. I used a paper mache’
technique by putting the ModPodge into a bowl and dipping the strips of fabric
into it. Then I squeezed out the excess just enough to keep it from dripping.
This let me be sure the fabric was saturated with glue and would stick nicely.
It would also help with the reinforcement of the basket.

This project took pretty much the entire bottle of ModPodge.
The muslin was mostly scraps, but it
took at least a yard. I used the matte
ModPodge because it will be underneath the paint. You could use white glue
instead, it is cheaper. The acrylic paint makes it water resistant. You would
be able to wipe it with a damp cloth when needed. But you would not want to
soak it in water. I worked on one end, let it dry, then did the other end. It
was easier than trying to figure out how to do the whole thing at once without
getting glue everywhere.
I worked on one end, let it dry, then did the other end. It
was easier than trying to figure out how to do the whole thing at once without
getting glue everywhere.
I did one layer then went back and did a second one for
strength. I
also wanted to get to where the dark paint underneath didn’t show
through the fabric which would tell me I had two layers and it would be nice
and strong..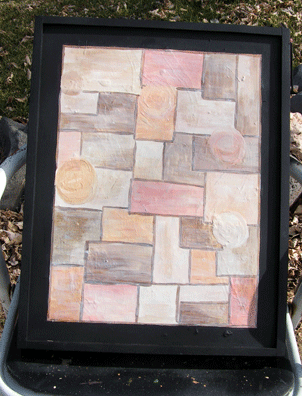 Once all the glue was dry I painted the whole thing with a
tan color (acrylic paint). This was just to create a background and a primary
coat of paint over the fabric. I painted the inside first and let it dry. Then I
painted the outside. This makes it easier to handle and since the paint dries
in about fifteen minutes it goes fairly quickly.
Once all the glue was dry I painted the whole thing with a
tan color (acrylic paint). This was just to create a background and a primary
coat of paint over the fabric. I painted the inside first and let it dry. Then I
painted the outside. This makes it easier to handle and since the paint dries
in about fifteen minutes it goes fairly quickly. Then it was time to get creative. This meant coming up with
some sort of paint scheme. This is always where I get bogged down. I have too
many ideas and am never sure which one will look the best.
Then it was time to get creative. This meant coming up with
some sort of paint scheme. This is always where I get bogged down. I have too
many ideas and am never sure which one will look the best.
I decided to do something similar to the serving tray I
painted last year.
So I painted the ends, inside and out, with black. I also
painted the bottom black. Then I used the bottom of the serving tray as my
example to paint the inside of the basket. I used a light brown to draw on the
lines and circles and then painted it.
I let the paint dray a couple of days before I sprayed the
whole thing with a sealing varnish.
 Obviously this took several days to paint but it looks cool
and will make a great display.
Obviously this took several days to paint but it looks cool
and will make a great display.
Til next time. J
Terri
Stop by my Etsy shop for new arrivals
www.etsy.com/shop/1krazyrtist
No comments:
Post a Comment