Tuesday, April 26, 2016

Steampunk Altered Picture Frame

This past week I was watching how-to videos on YouTube. I started with oil painting, then went to mixed media, and ended up on Steampunk. I found altered tins, altered frames and art on canvas.

Needless to say I was very inspired. I have been struggling with what to do for art to sell on my Etsy webstore. I spend every day looking for ideas. The time I spent on YouTube was more valuable than I can say. I got very excited about going back to doing some of the crafting I did when I was first writing this blog.

The project today, an altered picture frame, came from that time on the computer.


I started with a frame that measures 7 ¼” x 9 ¼”. It is a wood frame designed to hold a 5x7” picture. I bought it to use for a small watercolor painting. Now it has a different life.


First I glued on some paper doilies. These are the ones you find in the cake decorating section that are used to put under cakes and treats. I laid the pieces on so they would create an old style of texture. I used ModPodge as the glue and as a seal on top.


Once the glue dried I rubbed on some acrylic paint (Raw Umber). I did a thin layer so there was a lot of different shades on the frame. I did not want to make it too dark. I used my fingers and I put the paint all over, even on the back.


After that dried I began gluing a variety of watch parts, hardware and other fun stuff. I used an old ne.cklace (cheap, not real gold) as a chain to connect the gears and other parts. The idea was to create the look of machinery. I used E6000 glue for this. It is a wonderful industrial strength glue that will hold the heavier pieces on the frame with no problems. It also stands up to being painted with the acrylics and water.

I collect junk. Yes. I pick up washers, screws, wire, and other things that I find on the ground. My husband brings me some amazing metal pieces when he takes apart any appliances or computers.  I also was lucky to get a whole box of watch parts from a friend a few months ago. I don’t think he knew the value of that box.


I let the glued piece sit overnight. It sets quickly but isn’t really dry for about 24 hours.


I mixed some ModPodge with some of the raw umber acrylic paint. Approximately 1/3 glue and 2/3 paint. The theory is that the glue will help the paint adhere to the pieces glued on. I also did not want an opaque look. I wanted the pieces to have cohesive look but not enough to mask their unique looks. Like the watch faces. I wanted to be able to still see what makes them so cool looking.


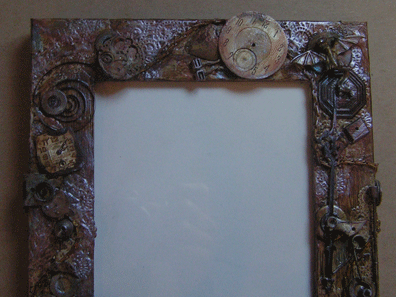
I let this paint/glue coating dry. Next I took some Folk Art brand metallic acrylics, Metallic Antique Copper, Metallic Blue Topaz and Metallic Pearl White and added some accents. I did thin watered down washes and just dabbed with a brush. I wanted highlights and subtle colors all over. It was looking a little boring and the colors just added a little pizzazz.  Then I did a last light coat of the ModPodge to seal it. Since I had done watered down washes I was concerned about the integrity of the paints. The final seal coat will keep the paint from rubbing off. (But the fact that it’s gloss over metallic paint made it hard to photograph)


It’s ready for the glass to go back in, and ready for a picture. It’s also ready to go on Etsy to be sold. And I am ready to create another one. I am also planning to do some similar work on canvas to create some fun artwork for my Etsy shop. I am so excited right now about these projects. I am enjoying the break from the too serious work of oil paintings and designing coloring pages.

Sometimes you just have to stop and give yourself a chance to remember what excited you in the past. What are you passionate about?

You know, just because you know how to do something does not mean you have to do it. I know how to paint landscapes and I know how to sew. But I don’t have to keep doing these things if they don’t excite me.

As always, I hope I have been able to inspire you to try something different. Or at least to consider new things.

Life is more interesting when we change our view of it.

Til next week.

Terri

1KrazyRtist

www.etsy.com/shop/1krazyrtist

ATC's - Artist Trading Cards - Revisited

I originally posted this in July of 2013 but I wanted to share it again. These are still around and still fun to make.

Have you heard of ATC’s? Artist Trading Cards?


They have been around for quite a while. I checked YouTube and found a video by Jerry’s Artarama (art supply) that gave the history. In 1997 a Swiss artist did a show creating 1,200 miniature paintings that each stood on its own, but when put together made one painting. At the end of the show he emailed his Swiss friends and colleagues and told them he wanted them to have a part of this installation. He had stipulations. They each got a piece but had to trade him for one of their own. And the size had to be 2 ½ x 3 ½ inches. That’s how the idea got started.

Artist Trading Cards can only be traded or given away. They are not supposed to be sold. Though some people may be ignoring the rule and selling them. The size, 2 ½ x 3 ½ inches, is the only requirement. 

Many of the art supply manufacturers now offer packages of pre-cut cards to be used for ATC’s. There are lots of videos on YouTube showing different designs. You can paint, draw, collage, etc. Or just do doodles. There are groups on the internet for trading. You can also just trade with your fellow artists. But anyone can make these. They are as simple or as complicated as you want to make them.

I decided to make a few and start my own collection. So I cut some watercolor paper (130 lb) into the right size for making ATC’s.


I started by doing watercolor washes on them just to give a little background to inspire me with ideas for what to put on them. I kept adding splatters and paint to brighten them up.


On the blue one I used one of my fish stamps with black dye ink. For the plants I used a Sharpie fine point permanent marker.

 
For the yellow one I drew a water scene. My reference was a small painting I did last year. It created a nice little mini piece of art. I used the Sharpie fine point permanent marker for the drawing.


For the green one, well I drew a semi abstract landscape, that I did not like. So I covered it with some nice semi sheer tan paper, then added some strips of cardstock that had been inked and painted. They created a great background for the vellum piece with the words. An embossed butterfly from my stash completed it nicely.


For the red one, I glued on a piece of a transparent sheet that had been colored with alcohol inks. I used ModPodge over the entire card because I wanted the whole piece to be secure. I put the ink side down. The alcohol inks come off on your fingers so they would smear if I tried to put glue on and add something over it. Then I added tissue paper stamped with the hearts. The stamps are ones I carved some time ago. I normally use them on polymer clay for necklaces.


 This was a fun, and messy, project. I enjoyed creating the miniature pieces of art. I plan to make a few more while I have the supplies out. In fact, I really like the idea of other artists, using the ATC’s as business cards. It’s a wonderful way to make yourself memorable as an artist.


They are really fun and take up very little room (unless you make lots and start trading for a collection). This is a really easy project and I think the kids would have a great time doing mini art to trade with their friends. Some glue, scraps of paper, watercolor paints and markers, cardstock, and even beads, ribbon, charms, and some rubber stamps make for some great summer fun. People also do them out of fabric and create sewn pieces. 

Also check out Google Images for Artist Trading Cards for neat ideas on subject matter.

Til next week. J
Terri


Be sure to check my Etsy store for new works. www.etsy.com/shop/1krazyrtist

Wednesday, April 13, 2016

Wire Wrap


Yesterday I was at a loss as to what to do for this week’s post. I have this problem most weeks. I wander around trying to decide just what I want to write about each week. I really should start making a good list of projects.

So. I finally decided to show some photos of wire wrapping.

We live near an old gold mine that has a gift shop and where you can tour the grounds. The driveways are covered in what is called ‘slag’. The leftovers after the gold is removed. These ‘stones’ are really cool looking, with ridges and odd wrinkles. I love rocks and wood with what I would call Character.

 
This photo shows some of the pieces of slag. The three on the right are plain. The ones on the left I coated in a gloss to give them shine.

I had picked some of these up and asked the shop clerk how much she wanted for them. She gave them to me, free. I was thrilled because I saw something that could be wire wrapped and might look cool. Some of these pieces may actually still have teeny tiny dust size pieces of gold inside them. But you can’t see it and it isn’t worth trying to break up the stones to get it.


Interestingly, in Cottonwood, Arizona there is a long, black hill of slag in the middle of town. One of the gold mines, many years ago, dumped it there during the processing of the rocks for the gold. It is extremely hard stone now and has been there for decades. Recently and company built a processing plant and is now attempting to break up and process all that slag. I’m sure the residents are going to be happy one day when that black hill is finally gone.

Since I have all the wire I just went through my boxes and found what I needed.

I used a 20 gauge wire for what I call the framework piece. I try to shape it so it will support the piece and have a loop at the top for hanging.

Then 24 gauge wire is wrapped around the frame wire and the stone. I create a decorative back as well as front. In some cases the piece could be worn with either side out. Stones are beautiful from all sides and I like having options in my jewelry pieces.

The process of wrapping the wire to hold the stone against the framework takes several hours usually. Sometimes I have to unwrap and rewrap or completely start over.

I try to draw my ideas on paper before beginning so I can troubleshoot the problem areas. The trick is to wrap it decoratively but to secure the stone so it won’t fall out. But you also want to allow the beauty of the stone to show. So you don’t want to cover the front with too much wire.


This is a picture of a piece of glass that I wrapped yesterday. I bought the piece of glass at a yard sale a couple years ago, because it is so interesting. At first I thought it might be stone, but after thorough examination my husband and I concluded it is glass (probably from someone who does glassblowing).


The color on these two photos is different because I laid the piece on paper to take the bottom picture. I held the piece up to the light for the top one. The glass is semi-transparent and this is why I tried to wrap it so the wire didn't take away from the cool patterns.


I use the craft wire that is gold plated or silver plated. It is only about $3 a roll. I can’t afford genuine gold or silver at this point. You can find the wire in craft store , and WalMart, in the jewelry supply section. 

You can also get the jewelry pliers in the same section of the stores. I have also gotten some of them at a Home Depot. Sometimes the wire cutters get dull so I usually buy heavy duty ones.

All of the supplies are also available from Fire Mountain Gems or your local bead store, or even a jewelry supply.

This may not be a craft for you. If not, keep looking for new ideas. There are so many crafts out there to try. Many are inexpensive too. Take a class at Michaels or Joann's, or check out your local rubber stamp supply store.

There are endless possibilities. I love learning new crafts and new techniques. I find that you can always use the new techniques for some of your old projects.

Til next week.

Terri

www.etsy.com/shop/1krazyrtist


Wednesday, April 6, 2016

Steampunk Altered Altoids Tin


I have had this tin for months and have wondered what to do with it. Today I decided to do some gluing and creative craziness.


I started by going through my stash of junk and finding some old semi-rusted sewing machine bobbins. I decided they would make great feet for the tin.

I glued on the bobbins and let the glue dry completely. Then I taped the sides and lightly spray painted the bottom and feet gold.  

While looking at the bobbins on the tin I realized this would be a Steampunk project. I do love the Steampunk.


Once the gold paint was dry on the bottom I began gluing watch pieces and chain on the lid to create a Steampunk look.


Something I have in abundance are the very tiny gears, screws, and other pieces that hold the watches parts together. I have a bag full of very tiny parts. These parts work perfectly to fill in the small gaps between larger parts. They pop into the excess glue and add to the whole look. Sometimes you have to use tweezers or pointed pliers to get them into the narrow gaps. But they look so cool.

 
On the inside I glued pieces of decorative paper. Since the box is hinged I had to use something thin on the inside of the lid so it wouldn’t interfere with the box closing. I wanted to put in a mirror but it didn’t work.

It was about this time that I decided to add the chain around the base of the tin (see photo above) to cover the bottom edge where the feet are glued. It seemed to finish the box.


 Once all the glue was dry on the top of the tin, I sprayed it with gold paint.


 After the gold paint dried, I sprayed a mist of black onto it. Then I kept spraying them onto each other while wet and got this cool antique gold look.


All paint spraying was done outside with the box sitting on newspaper. It’s never a good idea to use spray paint in an enclosed space. By the time I was done the wind had come up. It’s a good thing I was happy with the look by then.

Instead of watch parts you could use lots of beads and glue them all over the top. You could use wooden beads for the feet.

I use E6000 glue. It’s industrial strength glue that bonds many things. It is not good for children. It sets in minutes but takes up to 24 hours to fully dry. A toothpick is very useful in applying the glue into small places.

Clothespins are also handy for holding things together while glue dries.

One use for this little box would be for earrings. Or rings. It could sit on your dresser and hold small pieces of jewelry. Or on your desk for paper clips.

I hope this one inspires you to get creative with your own stash of crafty supplies. I save so many fun things just waiting for a chance to use them. Sometimes it takes years before I do finally find a use for some.

Happy creating.

Til next week.


Terri