Monday, January 20, 2014

Steampunk Computer Case Revisited

This is a post from June of 2012. It's one of my favorites. Hope everyone has a great holiday.

As an artist I get so bored with the same old stuff you see in the stores. Computer cases are made of leather, or faux leather. They are black or brown and show absolutely no sense of whimsy or fun.

So, what would you do about that? Well, I decided to get krazy.  Yep, I made my own, with a Steampunk theme, of course.


I started with a wood artist’s box that I have had for a very long time. It has gone through a variety of paint finishes and for a while I had an ink drawing of a dragon on the lid.

The box was covered in black acrylic paint first. Then I cut out pieces of mat board and began gluing them on with Golden Matte Medium. Since I had painted the wood with acrylic paint, the matte medium created a nice bond between the paper of the mat board 
and the paint. White glue or ModPodge would work as well. The problem with white glue is that there is no additive that makes it water resistant. White glue will become tacky the minute water, or any liquid, meets it. Acrylic mediums and ModPodge become hard, waterproof surfaces that will not be affected by liquids. Unless they are left to soak in it.

Black acrylic paint was used on the mat board and some of the gears to give it a more industrial look, then metallic copper was sponged on to give a mottled look. I used some metallic blue and metallic violet in a few places for variety.  The copper paint over the black gives a very cohesive feel to the piece.

Lots of gears, washers, and metal pieces were added. And the ‘rivets’, those are large sequins that were glued on, painted black and then painted with gold. The gold paint over the black made them look like brass. I also used polymer clay to make a variety of large and small gears.

The whole thing was given a coat of glossy ModPodge once all the gluing and painting was done. The ModPodge sealed the work and gave it a wonderful shine. It brings out the variations in color that was created with all the sponge painting. It also reflects light off of the edges of the pieces to create darks and lights, drawing your eye to different areas.

The handle is a dog collar. I was going to use jewelry chain, but at a yard sale found the collar instead. It is perfect.  Heavy copper wire holds it to the box.

On the inside I cut out a portion of the dividers, covered them with polyester quilt batting and then with canvas. Once done the canvas decorated with Steampunk designs using Sharpie permanent markers. I didn’t want the inside to be boring. The exposed wood inside was painted black and copper, then decoupaged with fun scrapbook paper that has a map theme.

Straps to secure the laptop were made with canvas and Velcro. They are held in with small pieces of wood and screws that come in from the outside. The screws look like they are part of the piece and don’t look out of place.

Several things must be considered in a project like this:

 
The box will sit upright on the hinged edge when stored and on the bottom when being opened. Those two edges must be designed so that there is no wobble and that the gears and embellishments cannot be knocked off.


The lid, or top, can have more pieces and can have some sticking out. But everything must be put on so it will not get knocked off in every day use.

For me, the paint scheme had to flow from one side to another. Continuity was important. The blue and violet spots on the sides flowed over onto the top and bottom, or to the other sides. The edges of the mat board were cut so they matched up with the ones on the sides they were next to.

The handle had to be put on so that it would hold the weight and not fail when carrying the case.  Securing the wire inside was one of my biggest challenges.

I also made a security strap out of canvas and buckles to keep the case from opening when traveling. The strap was painted with the copper and black paints to match the rest of the box. Textile medium was added to the paints to keep them soft.

I hope you enjoyed this project as much as I did.

Til next time, make a mess and have fun doing it. Terri

Product Note: Acrylic medium and ModPodge are available in both matte and glossy formulas. They are available at Michael’s, Hobby Lobby, Joann’s, and your local craft store. 

Sunday, January 12, 2014

Happy to be back

It has been a while and I apologize for the absence. But I am happy to be back

Today I will start with a recipe. My husband and I are trying to lose some weight and this is one we love for breakfast. Though this recipe could be used for lunch or dinner. It would be great for a Sunday brunch with friends.

9” or 10” cast iron pan (it must be a pan that can go from stovetop to oven)
 
2 Tbsp olive oil, or veg oil
1 medium potato, washed and cut into ½” cubes
½ cup mushrooms, cut into ½” pieces
¼ cup chopped onion
¼ cup chopped green bell pepper
1 cup cooked ham, cut into ½” cubes
2 Tbsp butter or margarine
7 eggs, beaten
¼ cup parmesan cheese, or any cheese you want, grated
Salt and pepper

In the pan, on medium to medium high heat, fry the potato in the 2 Tbsp of oil until they are browned and mostly cooked through. This gives them a wonderful flavor.

Reduce heat to /medium/medium low and add the onion, mushrooms, and bell peppers, Saute this until the onions and mushrooms are softened. Sprinkle a little salt and pepper in and stir.

Add the ham and cook until it is warmed through.

Add the 2 Tbsp of butter and mix through to melt it.

Turn on your oven to broil (high) to warm

Pour the beaten eggs over the ham mixture and just wiggle the pan a little to get the egg mixed into and around the ham and potato mixture.

Keep the heat at medium low and let the mixture cook for a few minutes, until it has cooked up through, but not done on top. Eggs on top should still be liquid.

Sprinkle the cheese all over the egg mixture and then put the pan into the oven. Keep the oven door open while broiling. Cook just until the egg is fully cooked and the cheese has melted. I used parmesan cheese and it turned a beautiful brown and crunchy.

Let it cool for a couple minutes, then cut into wedges and serve.

Optional additions: cooked broccoli, chopped tomatoes, jalapenos, any leftover veggies, garlic, leftover steak or roast, cooked bacon, cooked sausage pieces, etc.

You can also add seasonings to give it regional flavors. Add a little chili powder and ground cumin with some jalapenos and ground beef to get a Mexican flair. Add Italian seasonings and sausage with mozzarella cheese for Italian.

This is a very versatile food that can be changed depending on what you want.  The basic ingredient is the beaten eggs. Everything else is optional. It’s kind of like an omelet.


 It takes about 45 minutes or so to make. But it is sooo tasty. 

This morning I did a variation by using a cooked Italian Sausage, mushrooms, onions, and a tomato. I added Italian seasonings and then topped it with mozzarella cheese once the egg had set in the oven. 

We cut the frittata into eight wedges and then we each have one for breakfast over four mornings. The key is the veggies. The more veggies the better for you. Each wedge has less than a whole egg and a bit of each ingredient. By cutting it into eight and only eating one wedge each morning we reduce our calorie intake but are happily satisfied until lunch. The egg is protein and dairy, the veggies are good and if you add meat you get more protein. 

I hope you enjoy this recipe. :) 

Til next time.

Terri

Saturday, November 30, 2013

Cone Christmas Trees Repost

This is a post from last year in December. 


I love Christmas. Such a joyous and fun time of year. And the wonderful decorations everywhere.

Are you looking for a fairly simple project to make holiday decorations? Well, this one is just that. It’s pretty simple and might be fun for the kids.

One of my favorite projects that the disabled group did during the holidays one year was to make cone trees. They covered the cones with felt or fabric and then glued pasta to them. Some pasta was painted with acrylic paint, others, like the farfalle (bow tie) was just glued on. (with a glue gun)

The trees were beautiful and I even made one at home for myself.

The three trees shown here were done in just a few hours with my glue gun. The first one I did was covered with green fabric and then tulle. I ran red and green ribbons down from the tip and then added small rhinestones as accents. The gold garland is actually a Mardi Gras necklace that I glued on.

The second one is the purple stretch velvet tree. I used an old necklace chain for the garland and washers from the hardware store for the ornaments. The top is more washers capped with a covered nut. Obviously I had Steampunk in mind when making this one.

The third tree was covered with felt that was cut into pieces. It took almost two large squares of felt and I started at the bottom and cut the upper layers smaller as I went. The garland is from the mini Christmas tree decorations you can buy at the craft store. The ornaments are glass pony beads. Once they were on I put gold glitter glue into the centers to make them sparkle.

To make the trees, I started with a piece of illustration board, cut to create a cone. Tape helped me keep it in shape while I used the glue gun to set it. The tape can be left on as an added support, or taken off once the glue sets.

For the velvet and striped trees, a piece of fabric was cut just a little larger than the tree cone and one edge was turned and glued to create a nice finish. The unfinished edge was glued first and then I worked my way around the cone. The bottom was snipped to make gluing easier.

The stars on the top of the tall trees are polymer clay. The clay was rolled out to about a quarter inch thickness and a star cookie cutter was used to cut the shapes. Then a skewer was used to put the hole in the bottom. Both stars were dusted with Ranger embossing powders for color and glitter. They were baked with the skewers in place to prevent the holes from collapsing while hot. They were glued on the trees with E6000 glue. I did put a chenille stem into the hole in the top and glue it down, then left a piece sticking up to glue into the hole in the bottom of the star. This helps to keep the star stable.

Cone trees can be any color, any fabric. You can decorate with whatever you want. You could cover them with feathers, glitter, stars, pasta, or wrap chains all around. The decoration is totally up to you.

This is a fun project. You can decorate with one, three or a dozen. They could even be given as gifts. Decorate your desk at work. Put a small one on the bathroom counter. One for every room in the house.
 
If doing this one with the kids, you may have to help with the hot glue gun. But they will love making a tree for their room or to help decorate the house.

Let your imagination go wild. And make it messy, of course.

Til next time. J

Terri

Supplies used in this blog are available at www.Michaels.com, www.HobbyLobby.com, www.Joanns.com, or your local craft supply store.


Thursday, November 7, 2013

Refinished Basket


This week I have been re-arranging my studio. It is still a place for me to work on my projects. But more importantly, it is now a space for meditation, healing and readings. I needed to make more space.

My husband and I are Reiki Master Teachers and we needed space for clients to sit during healing sessions. Now we have it.


So, while cleaning I found this great basket. I typically use it for display purposes. But it had gotten beaten up a little and I did not want to throw it away. So I repaired it and made it stronger. It measures 7”x18” and is 3” deep.

The basket is made with some light weight wood with the bamboo strips woven over it. The strips had broken and the ends were coming off. I had glued it together once before and painted it. But it needed more this time.

I started by using my hot glue gun to reattach all the broken parts. This is just to hold everything together while I do the next step. The hot glue would not stand up to any long term use, especially since one of the corners was completely torn and would never last.


Next up I pulled out some lightweight muslin and tore it into strips of different sizes. Tearing the fabric creates rough edges that would give a great texture later.

I used some ModPodge that had been diluted with a little water to attach the strips of muslin all over the basket. I wanted to reinforce the corners and cover the entire basket with the fabric. I used a paper mache’ technique by putting the ModPodge into a bowl and dipping the strips of fabric into it. Then I squeezed out the excess just enough to keep it from dripping. This let me be sure the fabric was saturated with glue and would stick nicely. It would also help with the reinforcement of the basket.
 
This project took pretty much the entire bottle of ModPodge. The muslin was mostly scraps, but it
took at least a yard. I used the matte ModPodge because it will be underneath the paint. You could use white glue instead, it is cheaper. The acrylic paint makes it water resistant. You would be able to wipe it with a damp cloth when needed. But you would not want to soak it in water.

I worked on one end, let it dry, then did the other end. It was easier than trying to figure out how to do the whole thing at once without getting glue everywhere. 


I did one layer then went back and did a second one for strength. I
also wanted to get to where the dark paint underneath didn’t show through the fabric which would tell me I had two layers and it would be nice and strong..

Once all the glue was dry I painted the whole thing with a tan color (acrylic paint). This was just to create a background and a primary coat of paint over the fabric. I painted the inside first and let it dry. Then I painted the outside. This makes it easier to handle and since the paint dries in about fifteen minutes it goes fairly quickly.

Then it was time to get creative. This meant coming up with some sort of paint scheme. This is always where I get bogged down. I have too many ideas and am never sure which one will look the best.

I decided to do something similar to the serving tray I painted last year.

So I painted the ends, inside and out, with black. I also painted the bottom black. Then I used the bottom of the serving tray as my example to paint the inside of the basket. I used a light brown to draw on the lines and circles and then painted it.

I let the paint dray a couple of days before I sprayed the whole thing with a sealing varnish.

Obviously this took several days to paint but it looks cool and will make a great display.


Til next time. J
Terri


Stop by my Etsy shop for new arrivals www.etsy.com/shop/1krazyrtist

Tuesday, October 29, 2013

Mini Top Hat revisited

Here is the post on mini top hats. These are so fun to wear.

These were just as much fun as the fascinators. But more work and a little trickier to put together.  There are some good videos on YouTube that provide more instruction on this. One of my favorites was a video on making the Mad Hatter costume from Tim Burton’s Alice movie for Halloween. It was really cool.

I’ve said before that I love Steampunk. And in the past two weeks I’ve been getting inspired again to do some more Steampunk projects. I spent hours looking at hats, fascinators and videos on making them.

The first one shown here is actually the fourth hat I made. It’s cardstock, light cardboard, purple velvet, a black zipper, black cord, metal washers and some necklace chain. And a fabulous yellow feather. I give my husband credit for the feather. I didn’t have any purple feathers and as he was watching me go through my stash, he suggested the yellow one.  It was perfect. Then I added all the embellishments.


I didn’t have any black ribbon or trims and while going through my supplies was inspired to use a zipper as the hat band. It led to this fun Steampunk style hat.  

A glue gun is best for this type of project. It sets quickly and you can move on to the next step. I tried white glue but had to wait for hours til it dried before I could go on. And everything had to be held together with clothes pins while it was drying. What a pain. Happily I didn’t glue my clothes pins to the hats. J


Step one was to cut out one three inch circle and one four inch circle from light cardboard (like the back of a writing tablet or a cereal box). Then cut a ten inch strip of cardstock that is four inches wide. You can cut this strip narrower if you want a shorter hat, or wider if you want a tall, skinny hat.


Then cut out two four inch circles of fabric, a five inch circle of fabric and a 11” x 5” piece of fabric. (If you cut a wider strip of cardstock, you will need to cut a piece of fabric one inch wider than you cardstock. This lets you fold over the fabric to glue it down.

Glue one of the four inch circles of fabric to the three inch circle of cardboard. Cutting notches around the fabric makes it easier to glue down.
 

Glue the five inch circle of fabric to the four inch circle, in the same way. Then use the four inch circle to cover the other side. This will cover your fabric ends and glue. You will put trim on this edge later.


Glue your strip of cardstock together by matching the short ends and overlapping a half an inch. You will have a tube that is ten inches around.  Lay it on your strip of fabric and start gluing it. You can glue just along the edges, the fabric isn’t going to move once it’s glued down. Then before you get to the end, fold over the end edge and glue it down. This will give you a nice finish. Then cut some slits in the fabric extending from each end of the tube. Glue the pieces down to the inside of the tube. I cut the slits to make it easier. Trying to glue the whole long piece is not that easy.


For the brim piece, glue the five inch circle of fabric to the four inch circle of cardboard the same as you did for the three inch circle. Folding over the edge and gluing it down. Here I glued down the center of the fabric with white glue spread thin. Then I glued the edges.


Next, take the second four inch circle of fabric and lay it over the glued down edges on the four inch circle. It should be barely smaller than your circle, but will cover up where you glued down the first piece of fabric. I also glued the center down with white glue. The reason, after this step is done two slits will be cut through the fabric cardboard piece and a ribbon will be threaded through. Gluing the fabric with white glue will prevent it from raveling. The ribbon is meant to be used to tie the hat to your head. So cut a piece of one inch ribbon long enough to wrap around your head and make a nice ‘little’ bow. It can be tied in front of, or in back of, your neck. It depends on where you set it on your head. If it’s sitting forward, you will tie it behind your ears at the back of your head.

Anyway, next is to glue the tube to the brim piece. Run the glue around the inner edge of the tube, right on the edge. Then set it on the brim piece, centered. If you can, keep the glue from oozing out on the outside. You will put a band around but I like to try to keep it as clean as possible.


Next, the top. Do the same as for the brim. Run hot glue around the inside edge of the tube, or around the edge of the small circle. Do this quickly. You have to put on heavy glue to keep it from setting too fast and get the piece on. You can lift the edge a little if it doesn’t glue down.

Then add ribbon or bias tape (or a zipper) to the base of the tube where it attaches to the brim. I used a decorative cord for the top edge of the hat, this covered any glue that is showing. I also used a double row of it to cover the brim’s edge. Trim, ribbon, or beads are wonderful for covering seams and glue.


Then embellish to your hearts desire. I added the feather, chain and other metal pieces to create the Steampunk look.


This is another fun project and you can make a great mess. I had fabric, trims, feathers and cardboard everywhere. I found a great way to use some of the small scraps of fabric I had stashed. Oooh, maybe I’ll do a patchwork hat.  I am also going to make some full size hats. I am having
soooo much fun. These would also be great on some of my art dolls.


I hope you are making great messy projects. 

Til next week. J


Terri

Fascinators revisited

Halloween is upon us and I thought I would share a couple of posts from last year on fascinators and mini top hats. These would be great for parts of a costume.

First the Fascinators post from last year.

Do you like hats?  Have you seen the hats they wear in England? How about those Fascinators? I am ‘fascinated’ by all things hats.

I love hats. Before I wrote this post I only had a couple of really fun hats. Now I have several miniature hats and Fascinators.

 After spending hours on the internet I got out my supplies and made a few hats and a some fascinators. I will show you a little here about making a fascinator, but I recommend checking out the videos on YouTube that give you detailed instructions. It’s fairly easy and gives you something fun, and different, to wear. I’m going to wear a different one every Sunday, and sometimes during the week.

I found some great stuff in my stash of goodies. The first fascinator was made with a feathered piece that is probably from a bridal headpiece. It was perfect.

First I cut out a piece of cardstock in a simple shape that mimicked the base of the feathered piece. This was the base for the hat.

I cut two pieces of fabric. One larger than the base, about a half inch all the way around. The second piece was the same size as the base.

I'm using a simpler piece to show the steps. I love this purple fabric.

I glued (with white glue) the cardstock base to the center of the larger piece of fabric. Then cut slits in the edges of the fabric around the edges and glued the tabs to the cardstock, with a glue gun.

A hair clip was hot glued on the underside (where the tabs of fabric are glued). This is tricky because you have to keep the clip open while gluing so it will open later. I used a little clip because that’s what I had. But a banana clip can also be used.

Then the smaller piece of fabric was trimmed just a tiny bit to make it fit onto the base. It shouldn’t hang over the edges. It was then glued, with the glue gun, to the base to covered the glued tab side. It covered the glued side of the hair clip. This left me with a nice fabric covered base for my fascinator.

Then it was time for embellishment. This is where you can get as crazy as you want, or as simple as you wish.

For the blog I have used a simple technique just to show the basics. 

I glued on a cool beaded trim. Then covered the edge with some fun rickrack. The rickrack hid the glued ribbon from the beaded trim which I thought looked rough from the folds I got while putting it on a rounded edge. I put a second piece of rickrack toward the center for interest. Trims are great for hiding glue and any happy accidents besides being nice to look at.

Then I glued the tulle on. In this case I tied a knot in it and glued the knot to the center of the fascinator. This one was done.

On the other fascinators I twisted and scrunched the tulle and sometimes tied it with thread where it would be glued down. The thread works great because it holds it together while you glue it down. Trying to hold it together with the hot glue getting on your fingers, well, let’s just say not good.

Ribbons, gold cord, and feathers are great for embellishment.


These are very light weight and will not slip. The clip allows you to place it wherever you want in your hair. I guess you could clip small ones to your lapel, or handbag. But they are great little fashion pieces. I want to make them in lots of different colors to go with everything.

These take less than an hour to make and using hot glue means you can wear it immediately. Make one today for that date tonight.

If you don’t like the hair clip you can glue your fascinator to a headband. I saw some little versions of this idea in the local dollar store yesterday. A headband with a funky flower glued on for $2, for kids.

This might be a fun project for older kids. The hot glue gun needs to be handled carefully. White glue is not ideal because it takes too long for it to dry. It won’t hold the tulle, or the feathers, in place while drying. You have to use clothes pins to hold things down, which could ruin what you are working on. Use a low temp glue gun if you do this with the kids.

I hope this inspires you to have some fun making fascinators. I know some friends at church who are already planning theirs.  I wore the one with the flowers yesterday and it was a hit. People I don’t even know said they loved it. Even a worker at Home Depot said he liked the feathers.

Start fun conversations where ever you go. Wear a Fascinator. 

Next week I’m going to share the mini top hats. I did them at the same time as the fascinators and used the same type of supplies.

I did make a huge mess this week. Feathers were everywhere, hot glue all over my fingers, and boxes of fabric and trims all over the floor. It was wonderful.

Have a great week. Create. And, of course, make it messy.  J


Terri

Monday, October 21, 2013

Burnt Glue Bat

  Today’s project is more about the technique than it is about the final product.

I learned to do this from an old craft show “Alene’s”. It was on tv years ago.

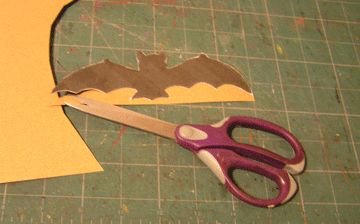
The original project calls for several layers of brown paper bags but since those aren’t used much these days I just used a piece of cardstock.  I found a bat shape online and printed it out. Then cut it out and glued it to the cardstock. I also cut out a couple of hearts to use as examples.

Then…. I covered one side with white glue. Alene’s Tacky Glue works best because it is thicker than most other white glues. Anyway. I covered one side of one of the hearts with glue. Making sure the edges were covered is very important, otherwise the paper catches on fire. The glue keeps it from really burning.

Here is where it gets tricky. You need a candle. The secret is to move the glue covered side of the heart back and forth over the flame. You want to hear the crackle of the moisture in the glue. Keep moving it over the flame til you don’t hear the crackles. Being careful not to hold it too long in one spot (it does catch fire). It will flame up every so often but usually goes right back out when you move it. Keep turning your glue covered paper to get the whole surface.

You do get black smoke and it doesn’t smell too good. You should do this outside or in a room with lots of ventilation. Don’t breathe the smoke.

Once it is done on the first side, repeat the glue and flame on the other side. You will notice that if you swirl the glue you will get nice swirl designs under the soot.

When you are done burning the glue, let it cool a minute or two. Then use a soft tissue or paper towel to gently wipe the soot off. The surface will be shiny in some spots. If there are wet spots put it back over the flame for a few seconds. Then wipe it again. Your piece may curl a bit, but it can be curled back with no effort.  The bat looks cool with the curling affect.

You can leave the surface like that, or you can put acrylic paint on it. I like to rub my finger in the thin paint and just lightly brush it across the surface. The paint will only catch on the raised spots and leave lots of black showing through.


I did the bat because this would be a fun way to make some scary bats for Halloween decorations.

I don’t recommend you do anything very large with this technique. Besides using a lot of glue, you want to be able to see what you are doing with the candle. It would also take quite a while to burn a large piece.


I like the idea of using this technique to add cutouts to a greeting card. You could make a small Christmas tree and use green paint on it to add it to your holiday card. Or hearts for a Valentine’s day card.

I hope this technique inspires you to try it and use the results on lots of projects.

Til next time. J
Terri

New this week in my Etsy shop: Spirit Guide and Angel Portraits, plus a couple fun tote bags.    Check it out at www.etsy.com/shop/1krazyrtist