Friday, September 9, 2016

Small Denim Jeans Bag

Yep, it’s late again. I really do have Tuesdays in mind for posting this blog when working on my projects. But right now my internet connection is not great and most days I cannot get on the net at all. But here is my latest project.


In the last couple of weeks I have made a couple of tote bags, one for my Etsy shop and one as a gift. I had bought some fabric that turned out to be stamped that it could not be used for commercial purposes. So I used it to make a gift. But I found some great horse fabric that was perfect for products for my Etsy shop. (living in Wickenburg, AZ is definitely influencing my ideas for projects).

Today I am sharing a small bag I made that was inspired by some nice little bags I saw in a gift shop last Saturday, while attending a festival here in Wickenburg.
 

I started with a pair of old jeans, cutting off the top and cutting them apart at the seams. Then I took the part of the back leg with the pocket, folded it to get the bag size, then cut it off. I measured it to make sure things were even all around. 

I got crazy and made it wider at the bottom, but you could just cut it square and longer or shorter, or even smaller without the pocket.


I used the piece I had cut as the pattern to cut out my lining fabric.


Then I cut a piece of fabric with horses on it and pinned it to the bag on the opposite side from the pocket. This would be the front of the bag. The pocket would be the back (and would be perfect for holding a phone or business cards).

I cut some one inch brown grosgrain ribbon and put one piece across the bottom of the fabric right where it would fold. The ribbon will show on the side where the pocket is. I then framed the fabric on the sides with the ribbon.


A pocket was created for inside by cutting a piece of fabric and a lining and sewing them right sides together. The sides and bottom of the pocket were sewn and then a strip of fabric was sewn to the top and folded over for a nice clean finish. The top edge was sewn to a piece of ribbon. Then the piece was sewn to the bag lining. The sides and bottom of the pocket were sewn and then the ribbon ends were sewn down. The ribbon runs across the entire side of the bag.


The lining was inserted into the outer bag and pinned together with safety pins. This is a quilting tip. The safety pins are great in place of regular straight pins, because you have no chance of getting stabbed and they won’t slip when you are moving the fabric around.


Strips of fabric were sewn onto the top edges of the lining and the denim bag to create a nice finish. The edges will be sewn together after the strap is made. 


A strap was made from a long strip of the fabric I used for the top edge of the bag, and a strip of denim from one leg of the jeans. I had to sew two pieces together to get the length I wanted so I did it with the standard technique, on the bias. 


I pinned the front and back of the strap together, folding the edges. I decided not to do the normal right sides together sewing and then turning it right side out. The denim is so stiff that it would have been too hard to do it that way.


The strap is pinned in between the bag and lining so it is sewn right into the bag and very secure. That also makes it so that you don’t have to make finished ends on the strap. The strap could be finished on the ends and sewn to the outside of the bag if desired.


 I wanted a bag that could be worn across the body. The strap could be made from many things, even braided fabrics. The strap was sewn onto the bag so that one end was on the front and one on the back.


To finish the bag on the outside I added a large button, glass beads and a piece of lace to make it more decorative and fun.


Using old jeans to make little handbags is fun. You can make them without lining if you want. The only thing to remember when using denim is that is ravels easily. So it is always good to stitch closely along all cut edges before sewing the bag together so it won’t start unraveling later. The stitching doesn’t show when the bag is finished.

Denim is a thick fabric and is sometimes difficult to sew along seams where the fabric is stacked. Try to flatten seams, trim and offset seams when possible. Even my machine, which is supposed to sew up to seven layers of denim, has a hard time sewing over a spot where I have two seams matched up.

When considering what fabrics to use to make tote bags, handbags and other things, look to old clothes. I have some really great bags made from men’s western style dress shirts. Thrift stores are a great place to find clothing to use for sewing projects, at a really great price. Look for shirts, long skirts, robes, and of course old jeans in a variety of colors. Think outside the box on this type of project.

This bag will be going into the Etsy shop this morning.

Til next time

Terri

1KrazyRtist

Monday, August 29, 2016

Mask Paintings from 1992


Last week I shared some older drawings. It inspired today’s post.

In 1992 to 1994 I lived in central Florida. I worked in a great metaphysical shop and was close friends with the owner. The idea for these mask paintings was born from a customer bringing in a 36”x48” canvas with a hole in it (from an arrow). The idea was to create something that would cover the hole and still be a cool piece of art.


After I created the first one I went out and bought some new canvases and created these pieces. I went on to create almost a dozen of these.

I began by using acrylic paint to create an interesting background. In some cases I sprinkled glitter on the wet paint.
 
I painted the plastic masks with spray paint. On the canvas behind the mask was some glitter to sparkle through the eye holes when light hit it. Once the paint on the canvas and mask had dried I began to lay out the fabric, mask and flowers to determine what the design would be.

I would get most pieces laid out on the canvas and then I would start gluing the pieces down. The layout was a general idea and it always came together as I worked.

I think my favorite is the pink one with the hat. It was a fun idea and I was happy when it came out so well.

These were a lot of fun to make and the sold well in the shop. I even did a couple of commissions for friends.

I never made any more of the mask paintings when I moved to Sedona, Arizona in 1994. Life changed and I didn’t do a lot of art for a while.

These were all 16x20” and 24x28”, but would definitely work on smaller canvases as projects for kids. You can find masks as small as 1” or 2” and the full size, at your local craft store. Michael’s and Joann’s usually have them in the same aisle as the feathers and doll making supplies.
 
This idea would also be cool for a group of friends to do as an art party.  A little wine and cheese, and lots of crafty supplies. Hmmm. This is giving me ideas.

I shared this group of works because they were more craft related than art. I hope it has inspired you a little. There are so many different ideas and ways to put things together.

I hope you step outside the box and try something new.

Terri.

1KrazyRtist


Thursday, August 25, 2016

Some Older Artworks

Well, it was finally determined that we cannot get Speedconnect here in this RV park. We are too far from their tower, behind the hills and below the level of the road. We knew this but it took multiple phone calls and several weeks before they figured it out.

So now we are using the wi-fi from the park. It is spotty and most of the time I cannot get on the internet. I have to try at different times throughout the day and hope at some point I will be able to connect. We are looking into other options (not much to choose from).

While this has all gone on I have had little time to create projects for this blog. But I realized that I might share some of my older artwork with you. I have found that my art changes with location. Each time I move and my life changes, it changes the type of art I create. Since I am back in an old western town my art will most likely return to the type of works you see in today’s blog.

I have been an artist all of my life. Today I am going to share some of the photos of work I did in the early 1980’s while living in California (my native state). I lived near Bakersfield (my birthplace), up in the mountains by Lake Isabella. Recently the area was in the news for the Erskine Fire that burned so many homes, entire neighborhoods. I still have friends there and they lost their homes. It is heartbreaking.

Anyway, these are photos of some of my pencil drawings and pen and ink drawings from that time.


 The rodeo drawings are from 1982 when I took six rolls of 35mm film at a local rodeo. I did a bunch of pencil drawings from those photos. I still have the black and white photos.

In the area where I lived there were/are huge cattle ranches and I liked to take photos of the cowboys as they worked in the fields. One of these is a pencil drawing, the the other is pastel/charcoal on gray paper.  These were framed because I showed them at a local art show. My parents and brother had these. Don't really know where they are now.


The two houses were historic old ones that I thought would make great pieces of art. One was pen and ink, the other (The Walker House) was done on scratchboard. 


The large building shown below, done in ink on illustration board, was an old flour mill in Weldon, CA that was one of my favorites for photos. This was large, 24x30". It was given as a gift to my closest friend, she loved it.


And the photo at the beginning of the post today is one of the trees, water and bird. This is the artwork I did for the Nature Conservancy Dedication Invitation. They purchased the land where the old flour mill sits along the south fork of the Kern River. They had a dedication ceremony and I had the privilege of creating the art for the invitation and the Itinerary List. It was done in ink and I used some of their photos to create the art.

I hope this was interesting for you. I thought you might like to see some of my work other than the crafts and recent paintings.  I may share more of my old artwork in a few weeks. I have also put a few of my older drawings on my Etsy store for sale. They are original pencil drawings.

Thank you for your interest in my blog posts. I do appreciate everyone.

Terri

1KrazyRtist

www.etsy.com/shop/1krazyrtist

Tuesday, August 9, 2016

Delay in today's post

Today I don't have access to the internet on my computer. So my post will be delayed. This is due to the lack of customer service from Speedconnect! 
They did not show for an appointment on Friday, and have not called to reschedule. 
I am very disappointed in their service.
As soon as I have some type of service I will post.
Thank you for your patience. I appreciate all of you who read my post.

Terri 

Tuesday, August 2, 2016

More Altered Composition Books


 In June I did the notebook to journal post. I used a dollar store composition book to create a personal journal. Here are a few more examples of the same idea. This is a fairly long post but I wanted to share these ideas.


For this project, I bought four composition books at the Walmart because they were on sale for back to school. Each was under a dollar. Two have regular lines and two have the graph paper.


I started the same way as the previous one, by covering the cover inside and out with some white paper to hide the black lettering and designs. My plan was to use some of my own artwork on the covers and I didn’t want the original designs to show through. I did find that using the 28 lb. heavy white printer paper hid the original cover. But the standard 24 lb. paper did not. Since I typically use the 28 lb. for the coloring book pages I had some on hand. I was able to print my artwork on the heavier paper and did not have to use extra paper to cover on two of the books. Cardstock also is heavy enough to hide the original cover but may be too stiff to use on the outside. It can easily be used on the inside. I just use my home printer with regular ink, nothing special.

If you use fabric on the cover it will most likely hide the original designs and words. But always check before you glue it down to make sure.

Once the books were covered with white paper I cut the copies of my drawings and artworks to the right size.  

The artwork for the outside cover was about ¾” bigger than the cover to allow it to be folded to the inside. Separate pieces were used for the front and the back because a strip of fabric is needed to cover the spine. The fabric is better because it allows the book to open and close. Gluing paper down makes the spine hard. (see below for that step)


The corners are glued down first and then the long edges folded over it. This gives the corner a nice finished look.


Instead of cardstock on the inside I used more of my artwork. It was cut to be smaller than the size of the inside of the cover. It covers the edge of the paper used on the outside and give a nice look to the inside.  It was glued (with ModPodge).


I noticed that the ink on the printed art work would smudge when touched. I used some Aqua Net hair spray to give it a little bit of a seal. The hair spray works similar to Workable Fixative that is used on pastel and pencil drawings. It dries quickly and put a layer on that keeps the art from smudging when you add more to it. Since I don’t have any fixative right now, the hair spray was a good substitute.

I also wanted to do some watercolor washes on the covers and I didn’t want the ink to run too much and muddy the colors. 


The steps for the spine are the same as in the June post:  For the outside spine I cut a piece of contrasting fabric approximately 3” wide and about 2” longer than the length of the spine.


The ends were folded and glued. Then the sides were folded about 1/3” to 1/2” and glued down. Then this was glued to the spine. It hides the edges of the artwork on the cover and gives a nice look to the book. It is important to keep the book closed when doing this step so the book will close properly when finished.


Once the spines were glued on and dry it was time to embellish them. This called for ribbon, buttons, polymer clay pieces, etc. This is the fun part in this type of project. The cover is just a background for all the fun embellishments.

Each book would be different, so I started by going through my decorative papers, fabrics and clay pieces to find the perfect embellishments. I found some great pieces from the papers. Glossy cardstock that I had colored with alcohol inks, handmade paper I made at least five years ago, beautiful scrapbooking papers, all were the perfect backdrops.


These papers give me the colors I used to put acrylic paint washes on the front of each book. Each book now had its own color scheme which then would lead me to the other fun embellishments.


I layered net and papers and cardstock to create each of these looks. The books changed as I worked and ended up a little different from the first photos you see.


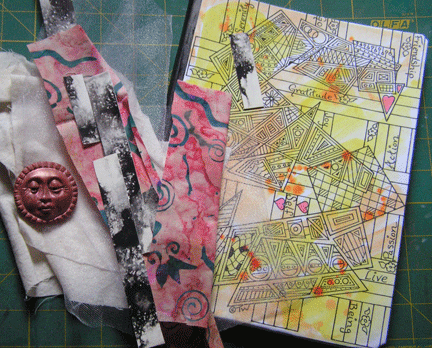
This first one, with the polymer clay sun face, has gold net, handmade paper, fabric, ribbon, and muslin that I painted with acrylics to match the color scheme. A copper wire spiral and some washers (some painted with hammered copper spray paint) were added as accents. It is one with lined paper to be used as a journal.


This second book has graph paper pages. It could be used as a journal or a sketch book. It has specialty tissue papers with fibers, fabric, glossy cardstock colored with alcohol inks, copper wire and a painted washer. The polymer clay focal piece was created by using a rubber stamp pressed into the clay. The image on the clay is from a photo my husband, Bill, took when we visited The Valley of Fire in Nevada, north of Las Vegas about an hour. The landscape is beautiful and the Native American petroglyphs are fabulous. This particular one is hidden behind a very, very large slab of rock on the side of another rock. Bill used to be a professional photographer and likes to climb to find unique photos. This image that had been carved so long ago was well preserved, but hidden from most people. I used the image to make my own stamp.


The third book has the same type of polymer clay focal piece (in different colored clay). The book has fabric, gold net, scrapbook papers and cardstock, and glossy cardstock that has been colored with alcohol inks and metallic pens. Creating these cardstock pieces is a fun process and may be a perfect project as a future post. Hemp cord was used to add more interest.


This fourth book has more of the glossy cardstock colored with the alcohol inks and metallic paint pens. It also has fabric,  ribbon and gold net. One of the pieces of glossy cardstock was created with acrylic paints. That process is simply putting dabs of paint on the cardstock and then laying another paper or cardstock on it and peeling it away. This creates some interesting designs and textures. It is a perfect way to create background pieces in corresponding colors for scrapbooking or art journaling projects. I found the white feather in my stash of goodies and thought it would be perfect to compliment the polymer clay Steampunk style heart. The black clay heart was dusted with embossing powders to create the colors. This book has graph paper pages and could be used either as a journal or sketch book.

I used E-6000 glue and Alene’s Tacky Glue throughout to adhere the embellishments and the spine fabrics. I used ModPodge to glue the artwork on the covers and inside the covers.

This is a fun project and I think the kids would have a great time decorating their own journals. A journal decorating party would really be a fun event for a group of friends.

I so hope that these books inspire you to create your own journals. Be wild and creative and experiment every chance you get with paint, papers, glues and lots of embellishments.

Til next week.

Terri

Hey: Check out the composition books at OfficeMax/OfficeDepot. This week they are 1 cent each. Woo Hoo. What a bargain. Perfect for creative projects.

1KrazyRtist


Tuesday, July 26, 2016

Mixed Media Artwork


One of my favorite magazines is Cloth, Paper, Scissors. This month has some really fun ideas and some challenges for readers. This project was inspired by one of those challenges. The hand lettering challenge seemed fun.

 I spent a couple days thinking about ideas and how to incorporate my art with a hand lettered message.


I decided to take a piece of heavy illustration board and cut it to the 8”x10” size. Then I used a piece of brown scrapbooking paper and tore it into odd pieces and glued them down for texture. I used Alene’s Tacky Glue for this.


Once the glue dried I got out my acrylic matte medium and eggshell white paint, and painted the whole thing to give my acrylic paints a good base. It also sealed the paper so it wouldn’t affect the colors of my paints as much.


Tip:  Adding matte medium, or gloss medium, to your acrylic paint will lighten the color without breaking down the integrity of the paint. You need less water to create a wash of transparent color by doing this. Too much water can make it very difficult for the paint to adhere to your background and the paint will lift when you apply your next layer, even if it has dried.

I used the small bottles of craft acrylics because they are already diluted and I could make washes with them much easier. At this point this was just an abstract background to work from. I added a layer of paint using a sea sponge to create a different textural look to the background.

Another coat of the matte medium was added to set the paint so it wouldn’t be changed by the next layer.


The next step was to add some pieces of cream colored lace fabric. My theme is time and a bit of Steampunk.  A couple of layers of odd shapes were added to add depth and texture. The lace was added using the matte medium as the glue. It permeates the fabric and adheres to the previous layers of medium.


The lace layer had to dry completely before moving on, giving me time to consider what was next.

Then more paint. I laid in a wash of blue and purple.


The next thought was to use some molding paste to add some more texture. I let this dry completely before moving on. This added some really white areas giving new options for laying down colors.

Then a heavy layer of matte medium was added to give me a more slick surface to work on. I wanted the thin paint to slide and run across parts of the surface.

Then more blue and purple paints were added, along with some raw umber for added dark areas. 

The face was added and then more paint was put over the top.

More matte medium was added. I like to layer matte or gloss medium between layers of thin washes. I feel that this separates some of the paint layers and lets the light bounce between layers. I think this gives the painting a higher level of transparency and creates a nice light effect.


At this point I had to stop and evaluate what to do next. The lettering idea did not seem to want to fit into the design. I could see that this was not the piece for the challenge. But it had some potential anyway.

I wanted to use some pieces of copper mesh, but it took a while to figure out how to add it.


Going through my collection of papers I found a piece of glossy cardstock that I had used alcohol inks on. It turned out to be right for putting under the copper mesh.
 
I got very involved in adding the rest of the pieces and didn’t take any photos. It’s easy to do this when you really get inspired. I just kept adding and gluing watch and jewelry parts.

I did add words and sayings that related to time (it’s only a matter of time, just a moment, hour by hour, once upon a time, dreamtime, time flies). Some were written right onto the background, others were written on painted watercolor paper and glued on.

The end result turned out to be a fun piece of art. I even put it into a frame.

Hope you have a great week.

Terri
 Note: My photos on this blog appear small. If you click on them they can be viewed larger. I just make them small to save room and to have them fit with the text.

Be sure to check out my Etsy Store for new items


Tuesday, July 19, 2016

Altered Sketchbook

The process of moving to another town is a tough one. It takes up so much of your time that it interferes with some things. Today's post is a revisit of one that was originally posted in August of 2012. I hope you enjoy.
--------------
Are you ever intimidated by the black drawing book? You know the one. It has a hardcover and costs more than a regular old drawing tablet.


I bought one of them years ago and have only put a few sketches in it. The solidness of it, the idea of it, makes me nervous.

It makes me feel like whatever I put into it has to be the best. It’s not like my plain old drawing tablets that have paper covers. Those I can rip pages out of with no reservations at all.

But that black book. It says “don’t even think about tearing out the drawings you don’t like!” Whatever goes in, stays in.


I was thinking this morning about what to do with this post. And the black book came to mind. What if I do things to the cover? What if I paint on it? Or glue things on it.?

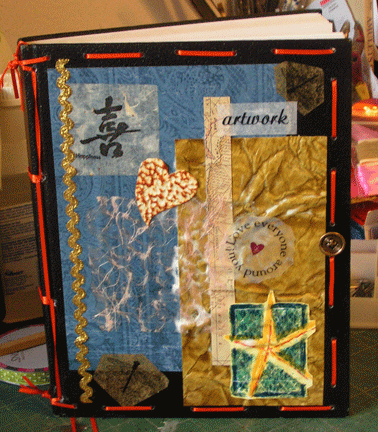
Well, here is what I did. First I marked out and drilled holes to run ribbon around it. I also marked holes in the spine to run cord so it looks like it was hand bound (sort of).

Then I got out some of my scrapbook papers, ribbons, a button, glitter, ModPodge, and some other trims.

I cut out the papers and created a collage on the front, and the back of the book.  

I had only a minor idea of how this would come together. I layered papers and added odds and ends from my stash of sayings, tissue paper, etc.


The holes I drilled were small so I only used one ribbon instead of three or four. I threaded the ribbon through the edge holes and a separate pair for the binding. I then tied all the ends together at top and bottom. This made fun tassles.  I also added a pair of ribbons tied to the knot at the top of the spine to act as a bookmark.

At left you can see the back. I created a loop with the ribbon to go around the button on the front as a clasp closure.

I may add something to the inside covers in the future. For now I think it is complete.

The intention of this project wasn’t really to make the book look pretty.  I wanted to make it less intimidating. My thought was “if I can drill holes and glue stuff to it, it will be easier to just draw with abandon instead of trying to be perfect.”


This way there won’t be any expectation that the contents are serious, amazing, or even my best work. I can now just draw, doodle, paint, or write whatever I feel, with no fear.

It’s the same with a blank white canvas. By painting it a light color, any color, it takes the fear out of putting bright paint onto a vast expanse of white.

See you next week. Experiment. Think outside the box. Try something new. Make one great big mess. As you can see behind the book, my work table is a pile of tools, glue, paint, the stuff for this project, and my oil paints. But I had fun and that’s what it’s all about.  Isn’t it?

And now I have to put some of this stuff away so I can do more painting and come up with next week’s post.
☺
Terri

Check out the new posts in my Etsy Shop