 I thought today I would share how I create my bound books. I
have been doing this for years and recently bought a new binding machine to use
for the coloring books.
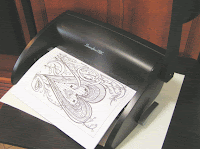
The coloring book was done with the new machine. The smaller
book, an affirmation book, was done with an old one in 2001.
 I like the new machine because it’s so lightweight and easy
to use. It costs about $70. There are
several different types that will punch different amounts of paper at one time.
This one does up to nine pages of regular 20 lb. copy paper. Because I use 28
lb for my coloring books I have to punch fewer sheets at one time.
The binding combs come in a variety of sizes to allow you to
create very thin books or really thick ones.
Once you have printed out the pages you simply punch them
and then lay them into the opened binding comb. The machine covers both parts.
The top half is the punch. By laying the paper in you pull the handle down and
it punches the square holes in the paper.
Then you have the binding comb in the lower front of the
machine in the opener. It holds the comb open while you lay the papers in it.
Then you release it and your book is done.
I think the hardest part is determining how to print out
pages that have text or pictures on both sides. My coloring book is tricky
because I want certain pictures with specific affirmations. I do the copying
all by hand to get the exact combinations.
If you just want to bind a bunch of random pages it is ultra simple.
Another option for binding is using a stapler. This extra
long stapler is available at the office supply store for about $30. It is great for booklets with just a few
pages. It has a movable paper stop that lets you set it for repeated use with
having to measure for every staple. You could actually staple the center line
of sheets as wide as 24”.
And lastly, the rings I used on this Smash Book can also be
found at the office supply. The open easily and all you need is a simple paper
hole punch. I used cardboard for the cover and punched holes in lots of pieces
of paper. You can choose to have two, three, four, or even more rings. And they
come in different sizes for thinner books. This one, and the binding machine
allow you to add pages if you want even after you have finished the book.
I love being able to bind my own books. Two years ago I
created books for my adult children of thirty years of my art, including
sketches and some color paintings. I still have the original print out so I can
make more copies. But it is probably over 100 pages. To create it I scanned my
drawings and old photos of my paintings into the computer. Then using
PowerPoint I created pages in chronological order. I used mainly my loose
sketches. I haven’t added any of the sketches from my stack of drawing tablets.
I could double the size of the book. I will have to create a set and separate
them into decades I guess.
I do hope that I have helped anyone out there looking for
ways to create their own books. I know that you can find book making ideas on
YouTube, but many require you sew pages together and do all kinds of things
that most of us don’t feel we don’t have time for. Or we don’t feel like we
have the ability to figure out what they are doing. I prefer something simpler.
I think it would be fun to get the kids involved in making
their own books by using either the binding machine or the stapler. Kids can
operate both and love projects like that.
Books, journals, sketch books, coloring books, you can do
them all.
Til next week.
Terri


No comments:
Post a Comment