Tuesday, May 31, 2016

Altered Wooden Thread Spools


Recently I bought my favorite magazine, Cloth Paper Scissors. There was an article where the artist used wooden thread spools and made them into hanging focal pieces. I love this idea, and I happen to have a whole bunch of wooden spools.


I began by cutting some drawing paper into strips to wrap around the spools. Watercolor paints were used to create the multi-color background and the antiqued brown. While the paper was still wet I tore one end so it had a rough edge. This can give a little more interesting character to a project.


Then a .005 tip Prismacolor brown drawing pen was used to write the words Peace, Serenity and Calm and some designs onto some of the strips. I did not take the thread off the spools because I was going to cover it up with paper. I also think it would be fun to do some without paper but keep the thread on as part of the decorative theme of the piece.

 
Fabric or lace was cut in a circle to glue to the ends. An X was cut into the center of the fabric circle so the wire could go down through the spool.


Small pieces of cheesecloth were glued on with ModPodge. Just another layer to create more character.

For the larger spool I cut a flower out of some fabric and glued it behind the polymer clay face.

The fun part of this type of project is that there is no right or wrong thing to do to the spool. Just experiment with beads, wires, fabrics, charms and other jewelry pieces.

Wire was used to wrap double terminated crystals from Tibet. By adding the crystal I felt it would aid in the feeling of serenity.


18 gauge wire was put through the spools and beads threaded on. Loops were created for hanging at the top and to put charms and beads from the bottom.


Both glass and polymer clay beads were used on these.  On the smaller spool I used a butterfly charm to hang at the bottom.

Very small spools could be turned into necklaces to wear. Larger spools can be used as decorative pieces or curtain pulls, or anywhere you choose.

These might be fun gifts when made to be inspirational for a friend or loved one. You could write a lovely message on the paper and glue on things that would make the person receiving it happy.


In the future I may add wire mesh, pieces of tree branches, driftwood, shells, jewelry chain, watch parts, springs, feathers, ribbons, and lots of other stuff to the spools. My mind is spinning with ideas. Polymer clay could even be baked onto the spools. Multiple spools could be connected to each other. Oh! the possibilities are endless.

I call these first ones ‘Serenity Spools’. I think they would be perfect to hang in a meditation room or wherever you need a little piece of calm and quiet.
 
Wire, beads, charms and the jewelry pliers can be found at any of the craft supply stores. I do recommend spending a little extra on your pliers. The inexpensive ones tend to bend and break after just a little use. I even get some of my tools at Home Depot.

ModPodge and E6000 can be found at craft supply stores and some grocery and retail stores.

I hope this has given you some new ideas for fun projects. You could even use plastic spools if you can’t find wooden ones. This might even be a good project for kids. They can glue on whatever they choose.

Til next week.

Terri

1KrazyRtist


Thursday, May 26, 2016

Krazy Lapel Pin/Pendant


This post is late because I hadn’t finished this project and wasn’t sure what to do for this week.


I was originally inspired by some fun handmade pendants I saw on a Google images search. They were fun with faces and wire and beads, all on a cardboard backing.


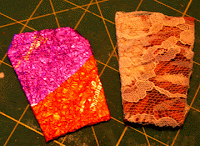
So I cut out some cardboard shapes to start the project. I originally started with a piece of fabric and some lace. While I was contemplating the next step I ate a couple pieces of my favorite dark chocolate. And the foil wrappers caught my eye. One purple, one red and wow, they were too cool not to use.


I used E6000 to glue the two pieces of foil to a cardboard shape.


Then a piece of copper wire mesh was added. Since the edges were rough and caught on everything, I folded them over just a little to create a smoother edge. I laid the mesh on at an angle and folded the corners over to the back to create a more interesting look.


Again, I used E6000 to glue down the corners in the back so the mesh would stay on.


I wanted an interesting texture so I wrapped some thin copper wire back and forth across the piece. Though it is hard to see in some places, the wire shows up when you get close enough. I used this wrapped wire to also wire on the freeform copper wire piece.


The tribal face was created some time ago with polymer clay. I used a mold to first create it, then etched some lines in it before it was baked according to the package directions. Once it cooled it was painted with some bronze and copper acrylic paints. Then sealed with some Future floor polish to make it shine.


I glued the face to the wire mesh. Then the necklace chain was dipped in ModPodge and laid on the piece. I dripped some diluted ModPodge along the chain to create a nice secure hold.


Last was the small turquoise chips. I wanted some splashes of a different color. The turquoise adds a nice touch.

I put a small copper ring at the top edge to allow me to wear this as a necklace. But I may glue a pin back on it too so I can attach it to a jacket or sweater.

The overall size of the piece is 2 ¾” x 2 ¼” .
 
This is a fun project. The main idea is to cut out some odd shaped cardboard pieces. Cover the pieces with either fabric, paper, or foil. Then just start adding beads, chains, wire, faces, cutouts, whatever you fell should be on it. It can have a theme, or just be abstract.

If the back of your pin/pendant looks less than appealing, I recommend gluing a piece of decorative paper or fabric to it. Cut the piece a little smaller than the size of the pin and glue it down well. If you glue on a pin back you want to make sure it has a solid spot under it so it won’t droop or tear when you wear it.
  
Having a fun time is key. Experiment and see what happens.

Til next week.

Terri

1KrazyRtist

http://www.etsy.com/shop/1krazyrtist

Tuesday, May 17, 2016

Steampunk Art Canvas


This week I have been working on this Steampunk canvas.


The canvas measures 11x14”. It was painted with a blue background first just to give it some character to work from. 


Then different paints were splattered and laid on as washes to give it more interest. At first I had no real plan as to what the painting would become.


Then the idea of a Steampunk piece crept in. So more metallic paints were added and some pen and ink markings inspired by my coloring book pages.


After that it was just a matter of adding the metal pieces to form an interesting piece of art.


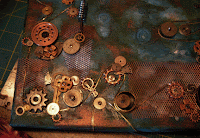
This has taken about four days to get it to the point I am finally happy. Some of the metal parts on this are not from watches or clocks, but just seemed to add personality. The copper wire mesh is from Michael’s and is meant for sculpting and other craft uses.


So the concept is that the sun’s energy runs down through the chains and watch parts to fuel the clock on the right side.


The sun piece was probably a lapel pin. Hammered copper spray paint was used to change the color from a gold tone. The spray paint was also used on some washers and other parts to give them all the right color for this piece.


The ring under the clock hand was filled with very tiny watch parts and then with diluted ModPodge. The ModPodge dries clear and it will dry leaving the pieces sticking up but stuck together. If I had used it without diluting it would have dried flat across the top and not look how I wanted.


After everything I wanted was glued on, black and copper acrylic paints were put on in washes to give it a more antique appearance.
 
Washers and other parts were glued to the corners of the copper mesh to keep them from coming up and to make it look as if they are screwed or bolted down. Small screws were glued into the center holes of all washers and watch parts, because they would be screwed down in real life.


Even though this is an art piece and meant to be whimsical, I personally have to keep it realistic enough for the brain to accept and understand what it is looking at. Missing parts or things that go the wrong way will drive me crazy until I fix them.


The final step will be to spray the whole thing with a varnish to seal the paint washes so they won’t peel off if touched or bumped. This will be done after the last photo is taken. The varnish would reflect the light so that the photo wouldn’t look right. As it is the metallic paint and many of the metal parts reflect the light and make the photo look different from it looks in person.

Every week, and every day, I look for new and interesting things to try. E-newsletters from Cloth Paper Scissors, or Quilting Daily, or Liquitex Acrylic Paints, and other fun sites, are all good resources. Searching through Google Images is a wonderful way to get ideas, as well as Etsy. YouTube videos provide good how-to information to help learn different techniques.

Wandering through local art shows are a fantastic way to see what is new and get ideas and inspiration.

Everywhere I go I am looking for new ideas, new techniques and new ways to use what I have at home.

Be inspired this week.

Terri

1KrazyRtist

Tuesday, May 10, 2016

Steampunk Inspired Trash Can

This week I was considering buying a small trash can for the bathroom. Since we live in a 29 foot travel trailer it would have to be a very small trash can.

 
I considered buying a plastic one, but then started looking around. I have been working on Steampunk picture frames and my eye landed on one of them. Hmmmmm. Yep. I decided to make my own trash can. But what to use to create it. An empty beverage box was sitting by the sink to go out to the trash. Aha. That was it.


So first the flaps had to be cut and glued down so they would reinforce the top edge. E6000 glue did the trick with clothes pins holding the flaps in place for an hour til the glue set.


I used the scraps from the flaps to cut inserts for the handle holes. The scraps were glued to a piece of card stock that was glued to the outside of the box.


Then the whole thing was covered in paper mache (newspaper pieces put on with diluted ModPodge. I think I put on at least four layers. I wanted it to be stronger than just the cardboard.


Once those layers dried, the whole thing should be painted with a coat of black acrylic paint. 


Obviously by the photos you will see that I left it white which was my mistake.


The paint tends to bubble when you put it on with a brush.  A white background under the cheesecloth means having to put on extra paint over several hours. Every time a coat dries you find the white spots. A black background gives you a step up on the process. 


I covered it with pieces of cheesecloth applied just like the newspaper. At least three, maybe four layers were applied. The cheesecloth adds both texture and strength. The cardboard and newspaper could possibly tear, but the cheesecloth will prevent that. I also made sure to make folds, ridges and bumps in the cheesecloth to create a very textured feel.


After the glue dried for the cheesecloth four little feet were added. I recently bought some wooden doll heads for just this purpose. They are flat on one side and work perfectly to be glued to the bottom of things as feet. E6000 glue holds them on perfectly. The glue had to dry for a few hours before I could do the next step.

Then….I painted the whole thing with a couple of coats of black acrylic paint. I painted the inside with the black as well. And a few more hours of finding all the little white dots and dabbing paint into them.


After the black paint finally was done, I used metallic antique gold acrylic paint to add the highlights. By using my finger to apply the paint it just hit the high points of the textured box and created an antique look. I rub my finger across the paint to create a thin coat of paint on it. Then I slide my finger across the textured surface. The paint only sticks to the high spots. I can add as much, or as little, paint as I want with this technique. I just keep adding until I get the desired effect.


The little feet were painted with the antique gold so they looked like little metal balls as feet. The feet will keep the bottom of the box from sitting on a wet floor.

After all the paint dried the whole box was sprayed with polyurethane varnish to make it waterproof. It is going into the bathroom and I wanted to make sure it didn’t fall apart if it got hit with any water.


Of course I will always line it with a small plastic bag. But it will still look cool in the bathroom.

Now I am looking for my next decorating project. There are so many options in this little trailer. It’s only eight years old and like new inside, but it could use some fun accents.

Hope you have a great week.

Terri

1KrazyRtist


Wednesday, May 4, 2016

New Paintings

 I thought I would share the two new oil paintings I have finally finished. And talk a little about paint.
This post was supposed to be up two weeks ago, but somehow it didn't get published. So here it is now instead.
Both paintings are on canvas panels. They are 8x10”. 

I love watching painting programs on the local PBS channel and get so inspired by them. I love the outdoors and especially love trees. I spent much of my life in the Sierras and love the trees and lakes that are so plentiful there. My favorite thing is actually dead trees. They have such character. They tell interesting stories.

I have worked with acrylic paints most of my life. It has only been in the past few years that I have really gotten into the oils. I do love to experiment and learn new things. So I have tried watercolors, alkyds, gouache, and charcoal and pastels. I love every single medium. Each has its own quirks and I find it entertaining to see how each one can be used.

I think the acrylic is probably the most versatile medium. Acrylic paint can be put on heavy like oils, or thinned down like watercolors. It dries quickly, making it perfect for craft projects. It is also great for those with allergies. No turpentine needed. No noxious fumes. Plus, if you don’t like something, let the paint dry. Then in fifteen minutes, or less, you can just paint over it.

Pencils, pastels, charcoal and colored pencils are great when you don’t want to really make a huge mess. There is no concern for spilling water or turpentine with these.

Oils are great for working wet into wet (like Bob Ross and William Alexander). You can change something while the paint is still wet by just scraping off the paint and putting in what you want. You can mix colors right on the canvas. I especially love the feel of the paint as it slides across the canvas.

I just love to learn new things and expanding on my knowledge of art mediums and how they work is a lot of fun.

Don’t be afraid to try new paint mediums, new techniques, or even new things to paint on. Wood panels, canvas panels, paper, old saw blades, an old pair of shoes, a wall, all are fair game in my mind. Obviously I will paint on just about anything.

Let your imagination run wild, then reign it in and evaluate the ideas. If something fascinates you, it might be worth a try.


Til next week.

Terri

Both of these paintings will be available in my Etsy Shop 

www.etsy.com/shop/1krazyrtist