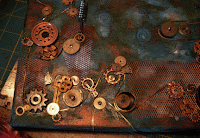
The canvas measures 11x14”. It was painted with a blue
background first just to give it some character to work from.
Then the idea of a Steampunk piece crept in. So more
metallic paints were added and some pen and ink markings inspired by my
coloring book pages.
 This has taken about four days to get it to the point I am finally
happy. Some of the metal parts on this are not from watches or clocks, but just
seemed to add personality. The copper wire mesh is from Michael’s and is meant
for sculpting and other craft uses.
So the concept is that the sun’s energy runs down through the chains and watch parts to fuel the clock on the right side.
The sun piece was probably a lapel pin. Hammered copper
spray paint was used to change the color from a gold tone. The spray paint was
also used on some washers and other parts to give them all the right color for
this piece.
The ring under the clock hand was filled with very tiny
watch parts and then with diluted ModPodge. The ModPodge dries clear and it
will dry leaving the pieces sticking up but stuck together. If I had used it
without diluting it would have dried flat across the top and not look how I
wanted.
After everything I wanted was glued on, black and copper
acrylic paints were put on in washes to give it a more antique appearance.
Washers and other parts were glued to the corners of the
copper mesh to keep them from coming up and to make it look as if they are
screwed or bolted down. Small screws were glued into the center holes of all
washers and watch parts, because they would be screwed down in real life.
Even though this is an art piece and meant to be whimsical,
I personally have to keep it realistic enough for the brain to accept and
understand what it is looking at. Missing parts or things that go the wrong way
will drive me crazy until I fix them.
The final step will be to spray the whole thing with a
varnish to seal the paint washes so they won’t peel off if touched or bumped.
This will be done after the last photo is taken. The varnish would reflect the
light so that the photo wouldn’t look right. As it is the metallic paint and
many of the metal parts reflect the light and make the photo look different
from it looks in person.
Every week, and every day, I look for new and interesting
things to try. E-newsletters from Cloth
Paper Scissors, or Quilting Daily,
or Liquitex Acrylic Paints, and other
fun sites, are all good resources. Searching through Google Images is a
wonderful way to get ideas, as well as Etsy. YouTube videos provide good how-to
information to help learn different techniques.
Wandering through local art shows are a fantastic way to see
what is new and get ideas and inspiration.
Everywhere I go I am looking for new ideas, new techniques
and new ways to use what I have at home.
Be inspired this week.
Terri
1KrazyRtist


No comments:
Post a Comment