Tuesday, March 29, 2016

A Fun Dog Charm Necklace


Today’s post is showing something I have wanted to create for quite a while.


Last May (2015) we lost our beloved dog, Nugget. He was 14 years old and very sick. It broke our hearts. I have wanted to make a necklace with some dog related charms and ribbon I found at Walmart. This necklace reminds me of Nugget and is a way to honor him.


In fact, all the supplies for this necklace can be found at Walmart. Just check the jewelry making section and the sewing section.

After several tries, this is my final creation. I used approximately 22” of ribbon to go around the back of the neck (this length allows for the knots). I love the dog prints on it. Then I made a couple of double loop jump rings to tie the ribbon off. This let me attach smaller single jump rings to the double one.

Put approximately two inches of ribbon through the ring to tie it off. If there is a little extra left as tails, just trim it off. You can use more ribbon, or less, depending on how long you want the necklace.

I used a piece of chain 13” long. To create the two different size chain lengths, I put a jump ring at about 5 1/2” and attached it to one end of the ribbon (to the double ring).


On the other end of the ribbon (double ring) I attached the bar part of the clasp. Then I took the two free ends of the chain and attached them to the ring part of the clasp.

The Love charm is place in the middle of the shorter chain. The dog paw print charm is placed in the middle of the longer chain.

Then the angel wings were put just three chain links from the Love charm.

The bone charms were put eight links form the paw print charm.

For me these charms represent the love that Nugget gave us and that is, and always was, an angel.


This is a simple little project and only takes about an hour to put it together. It took longer for me because I wasn’t sure how it was going to go together. Now that I have the measurements I could make one in less time.

At your local craft store (Michaels, Hobby Lobby, Joann) or Walmart you can find lots of cool charms and ribbon with fun themes. Match your ribbon to the charms and create some fun jewelry. All the clasps, rings and tools are available in either store.

This could even be a fun project for a jewelry party or a Saturday afternoon I’m Bored project.

I hope you make some awesome pieces.

Til next week.


Terri


Tuesday, March 22, 2016

Fun with Drawings

This post came about because I wanted to find a new way to use some of the drawings I created for the coloring books.


My first thought was watercolor paints for a colorful background. Then print one of the drawings on the background from the computer.


But the first background I did was using my colored pencils.  Even before the coloring book craze most homes have colored pencils for the kids. So I scribbled some color on a piece of drawing paper. By looking at the drawing I could see where the colors should be darker or lighter. I didn’t want to put a dark color where the face would be.


I printed the drawing right onto my drawing paper, over the background I had created earlier.


Then I did some watercolor.  I tried to lay down thin washes of color to coordinate with the drawing itself. I used cold press watercolor paper that is acid free. This will help the framed image last longer without yellowing. This paper is expensive but is best to use when creating a piece of work that will last. Artist drawing papers are also usually acid free and will not yellow. Printer papers are not good for this type of project.

 
I let the paint dry for an hour. I wanted to be sure nothing smudged during printing.

All of my drawings are scanned into my computer when they are done. The original drawing was larger than I wanted so I made a copy and reduced its size to fit into the mat.

The cool thing about this is that I can do backgrounds in a variety of color themes and create art for any room.  I can also do them in a variety of sizes. Of course, each watercolor background will be different even if in the same color scheme.  I can also scan the finished artwork into the computer which will allow me to reproduce the same art over and over.

You can also just do a copy onto the background. If you have a black and white drawing, put it into the copier and put your background paper into the paper feed. Copy your image right onto the background.


I found the frame at the thrift store for less than a dollar. It’s amazing how many great things you can find at thrift stores and yard sales. I did buy the mats because I wanted new ones. But nice wooden frames can be found many places. I am always looking and grab up any bargains when I find them.


It’s fun to get creative without spending a lot of money. You can frame any pictures you like. Most people these days have printers that also scan and most computers have a scanning/faxing program already in their computer. It’s an easy thing to do, or easy to find a friend to help.

Don’t be afraid to experiment. Paper is cheap and with frames from the thrift store you can create fun and beautiful art for you home at a minimal cost.

So now I am going to do some more printing. Have a great week.


Terri


Tuesday, March 15, 2016

Creating Bound Books at Home

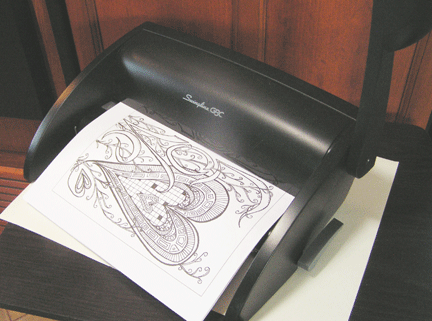
I thought today I would share how I create my bound books. I have been doing this for years and recently bought a new binding machine to use for the coloring books.

The coloring book was done with the new machine. The smaller book, an affirmation book, was done with an old one in 2001.

I like the new machine because it’s so lightweight and easy to use.  It costs about $70. There are several different types that will punch different amounts of paper at one time. This one does up to nine pages of regular 20 lb. copy paper. Because I use 28 lb for my coloring books I have to punch fewer sheets at one time.


The binding combs come in a variety of sizes to allow you to create very thin books or really thick ones.


Once you have printed out the pages you simply punch them and then lay them into the opened binding comb. The machine covers both parts. The top half is the punch. By laying the paper in you pull the handle down and it punches the square holes in the paper.

  
Then you have the binding comb in the lower front of the machine in the opener. It holds the comb open while you lay the papers in it. Then you release it and your book is done.

I think the hardest part is determining how to print out pages that have text or pictures on both sides. My coloring book is tricky because I want certain pictures with specific affirmations. I do the copying all by hand to get the exact combinations.  If you just want to bind a bunch of random pages it is ultra simple.

Another option for binding is using a stapler. This extra long stapler is available at the office supply store for about $30.  It is great for booklets with just a few pages. It has a movable paper stop that lets you set it for repeated use with having to measure for every staple. You could actually staple the center line of sheets as wide as 24”.


And lastly, the rings I used on this Smash Book can also be found at the office supply. The open easily and all you need is a simple paper hole punch. I used cardboard for the cover and punched holes in lots of pieces of paper. You can choose to have two, three, four, or even more rings. And they come in different sizes for thinner books. This one, and the binding machine allow you to add pages if you want even after you have finished the book.


I love being able to bind my own books. Two years ago I created books for my adult children of thirty years of my art, including sketches and some color paintings. I still have the original print out so I can make more copies. But it is probably over 100 pages. To create it I scanned my drawings and old photos of my paintings into the computer. Then using PowerPoint I created pages in chronological order. I used mainly my loose sketches. I haven’t added any of the sketches from my stack of drawing tablets. I could double the size of the book. I will have to create a set and separate them into decades I guess.

I do hope that I have helped anyone out there looking for ways to create their own books. I know that you can find book making ideas on YouTube, but many require you sew pages together and do all kinds of things that most of us don’t feel we don’t have time for. Or we don’t feel like we have the ability to figure out what they are doing. I prefer something simpler.

I think it would be fun to get the kids involved in making their own books by using either the binding machine or the stapler. Kids can operate both and love projects like that.

Books, journals, sketch books, coloring books, you can do them all.

Til next week.


Terri


Thursday, March 10, 2016

A New Painting

I hope you have had a good week. I am running behind as I prepare my artwork for my second coloring book. I am also trying to create other types of art for my Etsy store and I keep losing track of the days.

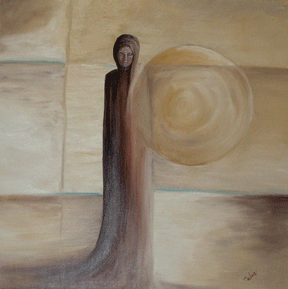
Today I am sharing the newest oil painting I finished this past week. Also a photo of one of the new drawings for the coloring book.

The painting is 16x20 inches on a nice wrapped canvas. I saw a cool painting on Google recently and was inspired, but when I searched for it a second time I could not find it. Which is good really. I had the inspiration but did not want to actually copy the piece. So I painted from my imagination. I still don’t know if I like it. But it is growing on me, slowly.


The drawing was inspired by Gustav Klimt. I love his work and wanted to create some coloring pages that had elements reminiscent of his works. This Goddess drawing will be available as a digital download file later today through my Etsy store. She will be paired with another of my Goddess drawings.


I am working on some ideas for crafting projects to post in the next few weeks. Just have to get details settled.  Hope you all have a wonderful weekend.

Til next week.


Terri


Tuesday, March 1, 2016

Wire Bugs and Lizards

I have been moving stuff into our new trailer and saw these little guys that I made last summer.

I was inspired to create these after going to some yard sales. One man had some large bugs made from really large metal rods and large rocks. I don’t do welding so I couldn’t do anything that large. But I do have lots of jewelry wire and there are tons of small rocks in the driveway.


I also needed a clip on the outside of the trailer for the park managers to hang notices. I decided to create the green lizard. He usually has a clip hanging from his long wire tongue.

The lizards are only about seven inches long and the bugs are up to four inches long.


I had fun experimenting with different stones and picking the beads for the heads.


Here is the bug’s belly. Each bug is one of a kind. The wire was bent according to the shape of the stone I used. 

Every bead head was chosen to go with the stone and to fit into the stone just right. I love some of the beads. The designs create some great faces and eyes.


Some of the bugs and the purple lizard have been sitting outside in the weather, which has caused some wire to rust, especially the orange bug.


Each one of these takes several hours to create. But they are so fun to look at.


This is one of the examples of why experimenting is fun. If you see something that intrigues you and it doesn’t cost too much to try it, do it. I look at each project as an education. Even if I only make one or two of something I learn so much that can be used later on some other project. The act of figuring out how to do it is good for the brain and very helpful in future projects.

I hope you try something new this week.

Terri


http://www.etsy.com/shop/1krazyrtist     

Tuesday, February 23, 2016

Value of Sketching Still Applicable

It’s been a busy week and I am running late on getting this posted.

We have had an issue with getting the title on a travel trailer. We are finally resolving the problems and just sent off a down payment on a different trailer (from a private party). The RV dealer will be refunding our money this week. We are very happy to be getting everything resolved.

In the meantime I have been moving our stuff out of the RV we got from the dealer. I haven’t had much time to think about writing this week.

So I will share a post from 2013 that I had deleted at one point.  

I am a proponent of sketching and drawing. I spend a lot of time doing preliminary sketches for everything from my paintings to my dolls, to my jewelry. I like to get the ideas on paper at the time they are playing in my mind. Then later I can go back through the sketch books and find my inspiration for new projects.

This week I am going to show some of my sketches and the resulting works that came out of them. I have spent most of the past two weeks doing lots of sketches for the project I want to put on Kickstarter.

First up you see above the 30”x30” painting called Starwoman, the Return. Here is the original sketch (approx 5”x6”) done back in January of 2009. The sketch is done in pencil and pastel pencil. The resulting painting, done in February, was in a group show in March 2009.


Next is a page of landscape sketches from the fall of 2012. I was doing a lot of oil paintings in miniature and so did several pages of small sketches to use as reference. You can actually see several of these in a previous post from August 2012.


Here is just one of the small oil paintings done from some of my sketches.


Last is an example of the bookmark designing from this past week. First are three sketches for one bookmark that I worked on. It took three to get to the one I liked. And below is the resulting stamp design.


You don’t have to go out and buy an artist’s sketchbook from the art store. The paper from your printer is fine. That’s what I used for my bookmark sketches. I cut out a template from cardboard and drew around it in pen to give me the right size. Then I just did the sketches in the rectangle in pencil.

Sketching helps you develop ideas. It gets the ideas out of your head and on paper where you can see whether they will really work. Sketches are not meant to be beautiful, perfect, finished art. They can be simple doodles that don’t have to be finished. And you don’t have to be a great artist to do sketches. It’s just about developing the idea.

Many times I sit and sketch while watching television. Partly because I have ideas I want to get down on paper. But partly because things I see will give me more ideas. I have a stack of sketchbooks from the past few years and two binders full of original sketches and photos of my artwork from clear back to the 1980’s. When I need inspiration I go back through them (sometimes every week). I forget what I might have drawn and am surprised to find that I can use those ideas for new project.

Many of the ideas for my new bookmarks came from older sketches.


Don’t be afraid of drawing and sketching. The more you do, the better you will be at it. You will be surprised when you go back months later to find that you can still see the idea in your sketch and how to use it now.

Sketching is not really a messy project. Except when my hands get black from all the pencil smudges. Oh and the pencil trimmings on the floor and my desk because I sharpen the pencils a lot. But that is all part of the fun.

So grab some copy paper and a pencil and make some marks. Use a three hole punch and put them into a binder. There you have a sketch book.

Til next week. J
Terri


 All the artwork in this post/blog is property of Terri Warren - 1krazyrtist. Artwork cannot be copied or duplicated without permission from the artist.

Webstore: http://www.etsy.com/shop/1krazyrtist

Tuesday, February 9, 2016

A New Focus

This week I am going to a couple of the paintings I have been working on.


I love making jewelry and dolls and lots of craft pieces, but I have been an artist since I was very small. Space is limited in an RV and drawing and painting supplies take up less room than jewelry supplies, doll making supplies, scrapbooking supplies, etc. I don’t have the luxury of a work table and spreading my supplies all over. I work at the dining table/booth and share it with my husband. (The photo was taken before we moved into the trailer.)


Truthfully, this is a great way to help me focus my energies. Having too many options can be overwhelming and stressful. Focusing on one or two areas instead of six or more can help. You can also become more proficient at the one thing you are doing when you aren’t trying to do too many things at the same time.

These watercolor paintings were done on watercolor paper. They are small sizes, 5x7 mostly.  


Watercolor is said to be the hardest of painting mediums. I would say that it takes practice, like everything else. If you want to be proficient at it, keep doing it and learning more about it. Don’t get upset if you don’t get it right away. If you really want to do something, anything, you have to work at it. Sometimes it takes lots of failure before you finally get it right. Many successful business people have been turned down a thousand times (Colonel Sanders KFC) before finding the one person who believed in their product. Keep trying and believe in yourself. You can do what you put your mind to.

Working small allows me to see how a painting goes together. Then, if I feel it would be good as a larger painting, I can paint it in a larger format later. I also do some ink sketches then add the watercolor paint. This creates a whole different look from just painting. The second painting, the tree and path, is done with an ink drawing. 

 I usually go to Google search and look up different types of paintings in the images to get ideas. Pinterest and even Etsy show so many great images it's fun to look. I get inspired by all the amazing art that is being created. 

Don’t hesitate to try something new.

Til next week.


Terri